
» How to use the Pilbara Identification Key
|
» A Quick TutorialA quick tutorial taking you through the steps of an identification using a plant specimen in Lucid key ...Go to Tutorial |
» Wattle FeaturesLook at important features of Acacia plants ... Go to Wattle Features |
» Best PracticeA short guide to the advantages and flexibility of the Pilbara identification key and Lucid program ... Go to Best Practice |
» How to use the Pilbara Identification Key
To start the key
- Click Identify a Pilbara Wattle button on homepage to start the key.
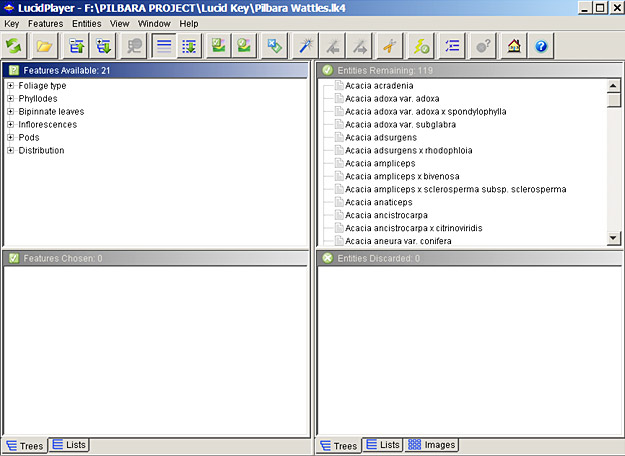
- When the key opens you will now see a screen divided into four panels, with a menu bar and tool bar at the top. The four panels display four lists:
- Features Available lists the features (i.e. characters) that you may use to describe your specimen to the key. When you first start the key will show a list of 21 features (there are additional 'hidden' features which may become available as you progress through the key).
- Entities Remaining lists the names of the entities (i.e. species, subspecies, varieties, hybrids etc.) that 'match' your description. When you first start the key this window shows a list of the entire 119 entities which are included in the Wattles of the Pilbara key.
- Features Chosen will list the features and their states as you select them. When you first start the key this window will be empty.
- Entities Discarded will list all those entities that do not 'match' your description. When you first start the key this Window will be empty.
Note: There are a number of ways you can configure how Lucid displays it’s on-screen information. For more information click the Help button ![]() on the tool bar.
on the tool bar.
To identify a specimen (i.e. name an acacia)
Your aim is to 'describe' to the key the unidentified specimen you have before you. As your description becomes more and more complete, the key will progressively narrow down the list in Entities Remaining until, hopefully, only one entity remains – you have identified (in other words, named) the entity to which your specimen belongs.
Features and states
You describe your specimen to Wattles of the Pilbara by selecting features (i.e. answering questions) from the list in the Features Available window. A feature is a broad character of the plant, such as Plants growth form, Phyllode length etc. A state is a particular variant of a feature, for example tree and the actual length of the phyllode are the states of the features Plants growth form and Phyllode length respectively.
| There are two basic sorts of features, multistate features and numeric features. | |
 |
 |
| Multistate Feature | Numeric Feature |
To select states of a feature
Click the plus symbol to the left of the feature name until its states are displayed. Multistate features are recognized by square checkboxes to the left of the state name, and numeric features are recognized by oblong edit boxes to the left of the state name.
| Tip. To display all states of all features in the Features Available window, first select the Features Available window by clicking anywhere inside of it (the title bar will change colour from grey to blue when selected), then click on the Expand selected list button |
Multistate features
Select a state by clicking on its square checkbox (a blue tick will appear inside the checkbox); one or more states for each feature can be selected this way. The state(s) you have chosen will appear in the Features Chosen list; also, the entities that match the chosen state(s) will remain in Entities Remaining window (those not matching will be moved to the Entities Discarded window).
 |
 |
As you answer more and more questions the list of Entities Remaining will get shorter and shorter until, perhaps, only one remains.
| Tip. Exercise care when using multistate features to ensure that you interpret the states correctly (see What if you do not understand a feature below). If you are uncertain about a feature or state:
|
Numeric features
Click inside the oblong edit box and a dialog window will appear into which you can type a measurement, then click on OK. You can enter either a single number or a numeric range (with the two numbers separated by a hyphen [-]).
All measurements in Wattles of the Pilbara are in millimeters (but you do not have to type "mm" into the box when you record your measurements).
Tip. When using numeric features you will increase the likelihood of retaining the correct answer in Entities Remaining if you:
|
What if you do not understand a feature?
As you work through the list of Features Available, you may find some features or states that you do not understand. Wattles of the Pilbara therefore provides illustrations and explanatory notes to help you in these circumstances. To view these illustrations/notes click on the multimedia icon ![]() to the left of the state name.
to the left of the state name.
| Tip. The correct interpretation of features and states is essential to performing a successful identification. Therefore become familiar with the feature/state notes provided by Wattles of the Pilbara. |
Which features should you use?
When you first start Wattles of the Pilbara, 21 features will be listed in the Features Available window (these features represent the Fast Find subset). Under normal circumstances it is advisable to try and answer as many of these questions as possible because this will most quickly reduce the list in Entities Remaining. You can answer questions in any order you wish, but it is normally a good idea to start by answering the first-listed question first (i.e. Foliage type) and then work your way progressively down through the list.
Commonly a few entities will remain after you have answered all the questions you can from the 21 features first presented. If this happens you can:
- load another subset of features into the Features Available window and continue the identification (see Subsets below); then
- ask Wattles of the Pilbara to decide what is the appropriate feature to use next (see Best and Shortcuts below); or
- compare information of the remaining entities to see if you can match your specimen that way (see Differences below); or
- scroll through the fact sheets of the entities remaining and see if your specimen matches any of them (see So what do you do when you have a species name? below).
| Tip. A judicious selection of features will help you get to the right answer faster. |
Subsets
Wattles of the Pilbara presents its features in six subsets. The All subset contains the complete list of 60 features that are available for use (additionally there are 11 ‘hidden’ features that may become available as you progress through the key); the other five subsets contain restricted numbers of features and are designed to be used in particular circumstances. Choosing an appropriate subset will make Features Available easier to scan by removing unwanted features. Also, by selecting appropriate features to answer you will most quickly reduce the list in Entities Remaining.
You can access the list of subsets by clicking on the Subsets button ![]() which is located on the tool bar or by choosing the Subsets option under Key on the menu bar.
which is located on the tool bar or by choosing the Subsets option under Key on the menu bar.
To select a particular subset, click the small checkbox to the left of the subset name (and a blue tick will appear in the checkbox that you select); you can select more than one subsets simultaneously by clicking more than one box. (To ‘deselect’ a subset, simply click in the checkbox again - and the blue tick will disappear.) Click OK and the features contained in the subset(s) you have selected will appear in the Features Available window.
The following subsets of features are available to you in Wattles of the Pilbara:
- All – This subset contains the entire 60 features (plus 11 additional ‘hidden’ features), which are available for use in Wattles of the Pilbara.
- Fast Find – 21 features which are generally easy to score and which have strong discriminating power; this is the default Wattles of the Pilbara subset and is the one that you will see when you first start the key and when you commence a new identification session.
- Vegetative – 34 features (plus seven ‘hidden’ features) relating to non-flowering and non-fruiting parts of the plant; distribution features are also included in this subset. If your specimen is sterile it is a good idea to start your identification with this subset.
- Phyllode – 19 features (plus two ‘hidden’ features) specific to phyllodes; distribution features are also included in this subset.
- Inflorescence – 12 features (plus three ‘hidden’ features) relating to inflorescences and flowers; distribution features are also included in this subset.
- Pod and seed – 19 features (plus one 'hidden' feature) specific to pods and seeds; distribution features are also included in this subset.
| Tip. When using Wattles of the Pilbara it is usually good practice to load the All subset and run Best on these features after first answering as many questions as you can in the (default) Fast Find subset. |
Best
If you get stuck and do not know which question to answer next you can ask Wattles of the Pilbara for assistance. You do this by using the Best or Shortcuts functions.
Click on the Best button ![]() located on the tool bar and all features in Features Available will be checked to find the ones that, on average, will give you the shortest list of Entities Remaining if you choose one of their states. When you use Best, Wattles of the Pilbara will, by default, find (and highlight) the best feature to use. You then can click the Next Best button located on the tool bar. Alternatively, you can configure best Best to sort the features placing those with the strongest discriminating power at the top of the list (you can change these options by using the Best mode option under Features on the menu bar).
located on the tool bar and all features in Features Available will be checked to find the ones that, on average, will give you the shortest list of Entities Remaining if you choose one of their states. When you use Best, Wattles of the Pilbara will, by default, find (and highlight) the best feature to use. You then can click the Next Best button located on the tool bar. Alternatively, you can configure best Best to sort the features placing those with the strongest discriminating power at the top of the list (you can change these options by using the Best mode option under Features on the menu bar).
Note: If you want Best to sort your features then you must first click on the Lists tab icon ![]() at the bottom of the Features Chosen window.
at the bottom of the Features Chosen window.
If the list of entities in Entities Remaining changes after selecting a state from a feature suggested by Best, it may be worth clicking the Best button again to recalculate the next best feature to use. Best can be configured to automatically select the next best feature for you to use by choosing the Automate option under Features on the menu bar.
Note: For more information concerning Best click the Help button ![]() on the tool bar.
on the tool bar.
Differences
Click on the Differences button ![]() located on the tool bar and a window will appear showing two panels; the upper panel listing features and the lower panel showing the entities listed in Entities Remaining with their state scores. Click on a feature in the upper panel and the lower panel will display the states scored for that feature for each of the Entities Remaining. You can then compare the features of your specimen with the recorded states for each entity.
located on the tool bar and a window will appear showing two panels; the upper panel listing features and the lower panel showing the entities listed in Entities Remaining with their state scores. Click on a feature in the upper panel and the lower panel will display the states scored for that feature for each of the Entities Remaining. You can then compare the features of your specimen with the recorded states for each entity.
Shortcuts
Like Best the Shortcuts functions will also assist you to decide which feature is appropriate to use next. Shortcuts searches for features that, if answered, would provide an immediate shortcut to an identification.
Click on the Shortcuts button ![]() located on the tool bar and a window will appear showing various features and their states (these will vary depending upon what entities are left in Entities Remaining). If your specimens possesses any of the states which are displayed then you will be left with just a single or few entities in Entities Remaining if you click the checkbox for that state.
located on the tool bar and a window will appear showing various features and their states (these will vary depending upon what entities are left in Entities Remaining). If your specimens possesses any of the states which are displayed then you will be left with just a single or few entities in Entities Remaining if you click the checkbox for that state.
Starting a new identification
If you wish to restart the key after having performed an identification click the Restart button ![]() on the tool bar or choose the Restart option located under Key on the menu bar. Restarting Wattles of the Pilbara will uncheck all features and states and clear both the Features Chosen and Entities Discarded windows.
on the tool bar or choose the Restart option located under Key on the menu bar. Restarting Wattles of the Pilbara will uncheck all features and states and clear both the Features Chosen and Entities Discarded windows.
What if you think you have made a mistake?
If you choose a state (or states) so that it becomes one of your Features Chosen, then later decide that you were mistaken, it is easy to change your selection:
- For multistate features click the checkbox for the state (the blue tick will disappear) in either the Features Chosen or Features Available window.
- For numeric features click the edit box in the either the Features Chosen or Features Available window and change or remove the values you have entered.
Note: Unchecked states will remain in Features Chosen until the key is restarted. Also note that by changing your selection the entities in Entities Remaining and Entities Discarded windows may change.
So what do you do when you have a species name?
In Wattles of the Pilbara, getting a name for your specimen is only the beginning. Once you think you have it, click on the multimedia icon ![]() preceding the entity name and you can view notes, illustrations, photographs and a distribution map of the entity:
preceding the entity name and you can view notes, illustrations, photographs and a distribution map of the entity:
Where to go for more information?
There are many more features of Lucid that can help make the most of Wattles of the Pilbara. As you become more familiar with Lucid and Wattles of the Pilbara, try using some of the other Lucid features. The Help button ![]() on the tool bar provides access to full on-line help for all Lucid operations and functions.
on the tool bar provides access to full on-line help for all Lucid operations and functions.
» A Quick Tutorial
The image below is of Acacia colei var. colei, a common Pilbara wattle. Our aim in this Tutorial is to use this illustration to identify the variety by taking you through the steps that you would follow in a normal identification if you were using a plant specimen.
- When Wattles of the Pilbara first opens you will see the screen divided into four panels: Features Available (21 features are listed at the top of the panel), Features Chosen, Entities Remaining (119 entities are listed at the top of the panel) and Entities Discarded.
- The 21 features listed in Features Available represent the Wattles of the Pilbara default Fast Find subset of features. These features are generally easy to score and have strong discriminating power. Therefore, answering as many of these questions as you can will normally most quickly reduce the list in Entities Remaining to a few (or even one) species.
- The 21 features are arranged in a hierarchical tree structure under six main headings, Foliage type, Phyllodes, Bipinnate leaves, Inflorescences, Pods and Distribution. The nodes of the tree are opened to reveal the 21 features and their states by clicking the plus sign to the left of each node heading. (To open all nodes simultaneously first select the Features Available window by clicking anywhere inside of it (the title bar will change colour from grey to blue when selected), then click the Expand selected list button
 on the toolbar.For the remainder of this tutorial we assume you have done this and that all nodes are open.
- We suggest that when you use the key you start your identification by answering the first question on the Features Available list first, then progressively work your way down through the list. (However, because this is a demonstration tutorial we will not follow this sequence of answering questions.)
If you are unsure about how to interpret the states of this feature then click on the multimedia icon to the left of the state name; a window will open showing information about the state and how best to use it. Close the state window by clicking on the 'x' in the upper right hand corner of the window.
- The state phyllodes is your answer to this feature; choose it by clicking the checkbox to the left of the state name phyllodes (note that a blue tick appears inside the checkbox)
- Look at the list in Entities Remaining. You will see from the panel that there are now 116 entities which have phyllodes. Answering this one feature has eliminated 3 entities (these are now listed in Entities Discarded panel). Also note that there are now only 15 features listed in Features Available. Six features have been removed because they do not apply to Acacias with phyllodes (they are features that would have been relevant, thus retained in Features Available, had the state bipinnate been selected).
- The next feature on the list is a numeric one. The phyllodes in the illustration measure about 170 mm long (note that all measurements in Wattles of the Pilbara are in millimeters). Choose the feature Phyllode length by clicking in the oblong edit box.
A numerics dialogue box will now appear telling you the range of values that are possible for this feature - in this case no species remaining in the key has phyllodes shorter than 1.5 mm and longer than 450 mm. Type into the box the value 170 (or better still, allow yourself a bit of latitude by typing a numeric range, for example, 150-200) and click on the OK button. You will see from the Entities Remaining that we are now down to 37 entities, a further 79 entities have been removed!
Note: This highlights an important feature of Wattles of the Pilbara, namely, numeric features are very powerful and should be used whenever possible; numeric features are generally more reliable than multistate features because there is normally less subjectivity involved in using them. Also, it is advisable to use a range of values rather than a single value because this will increase the likelihood of retaining the 'right' answer in Entities Remaining. Finally, be sure to measure accurately, especially for values less than about 10 mm.
- You can now choose other features. We suggest that you use Phyllode width (25-35 mm) and Pod width (3-4 mm) in the same way as just described for phyllode length. There are now just 6 entities in Entities Remaining.
- Next try Phyllode nerve number (flat phyllodes). There are three longitudinal nerves running the length of the phyllode so choose this state. You have now reduced Entities Remaining to four.
- Work through the Fast Find set and use Inflorescence Head/spike shape (select the state cylindrical spikes) and Type (select the state simple). You will notice that Entities Remaining is still four, no entities have been removed. This is because all four entities have simple inflorescences with the flowers arranged in cylindrical spikes.
Note: This serves to demonstrate that not all features in Wattles of the Pilbara have equal discriminating power; it really depends upon what entities are remaining when you use a particular feature.
- Where to go from here? We suggest that the first thing to do is to answer all the questions you can in the Fast Find subset, therefore use Phyllode cross-section shape (select the state flat) and Phyllode nerve anastomoses (select the state numerous). You do not have enough information to answer any more of the questions accurately. For example, you cannot know from the illustration whether the little mucro at the apex of the phyllode is spiny or not, nor can you see the peduncle clearly enough to measure it's length accurately or know whether it has hairs or not.
Note: As a general rule it is always best to ignore features that you are unsure about. If, however, you find that you must answer such features then maximize your chances of not making a mistake by selecting more than one state of the feature and/or by using a range of numeric values.
- Let's ask Wattles of the Pilbara to choose the next question (feature) to answer. You do this by using Lucid's Best function, but first you must load more features into Features Available by using the Subsets function.
When using Wattles of the Pilbara we recommend that, under normal circumstances, you load the All subset after you have finished answering as many questions as you can from the Fast Find subset. You can select your subset of features by clicking on the Subsets button located on the tool bar. From the window that pops up, select your subset (or subsets) of features by clicking the checkbox next to the subset name (a blue tick will appear in the checkbox that you select). In our case we want to choose the All subset, so click this checkbox, then click OK. After doing this the Features Available window will contain 54 features (plus some ‘hidden’ features that may become available to you as you progress through the key).
You can now use Best. To do this simply click the Best button on the tool bar and the Wattles of the Pilbara key will find and highlight the first ‘best’ feature for you to use. You now have two choices: you can either answer this question (i.e. choose a state for this feature, or enter a numeric value) and then click the Best button again, or you can ignore the question and move to the next ‘best’ feature by clicking the Next Best button
  .
.
When you click the Best button you will see that the feature Pod curvature will be highlighted; select curved (you can see from the illustration the pods are clearly curved). You now have one entity remaining in the Entities Remaining panel – Acacia colei var. colei. You have made a correct identification, well done! You can now click the multimedia icon to the left of the entity name to view information about var. colei, to view an illustration and photographs of it, and to see a map of its distribution.
» Understanding some important Wattle features
Here we will deal briefly with some of the more important features of Acacia plants in order to help you understand and interpret the Wattles of the Pilbara features correctly. In so doing your chances of accurately identifying Acacia specimens will be greatly enhanced. It is important to remember that in any key, a correct interpretation of features and their states is imperative to achieving a correct answer.
Many of the features discussed below are those given in the default Fast Find feature subset. These are the features that you will be presented with when you first start Wattles of the Pilbara and it is generally best to answer as many of these questions as you can before using other features because this will most quickly reduce the list in Entities Remaining. In most cases the Fast Find features are relatively easy to interpret and score, however, the following notes will provide helpful information and tips on their use.
Note: Much of the information presented below is also available to you from within the key by clicking on the multimedia icon ![]() to the left of the state name.
to the left of the state name.
Foliage type
The first leaves to appear on seedlings of almost all Acacia species are compound structures bearing a variable number of leaflets. These leaves are either pinnate or bipinnate, and as plants mature the leaves are commonly modified into phyllodes. Very young plants will often show the juvenile bipinnate leaves persisting at the base of the stem, regardless of what type of foliage occurs higher up.
In Wattles of the Pilbara questions relating to foliage assume that you score mature plants. In a very few species you may find 'reversion' foliage on your plant, i.e. adult plants which have bipinnate leaves scattered among the phyllodes; this may occur when the plant is damaged or diseased. In these cases it is best that you ignore these bipinnate leaves and simply select phyllodes from the Foliage type feature.
Phyllodes
Phyllodes are modified leaf axes that assume the form and function of a leaf. In Acacia there is great diversity in phyllode form and these structures offer many features for use in identifications (by loading the Phyllode features subset you will see that Wattles of the Pilbara has 15 phyllode features for you to use). Normally the phyllodes are apparently randomly scattered along the branchlets but in some cases they are clustered in groups (i.e. fasciculate) or arranged in whorls around the branchlets (i.e. verticillate): if your specimen has either clustered or whorled phyllodes and you select these states from the Phyllode arrangement feature it will quickly reduce the list in Entities Remaining. Phyllode shape is especially variable and sometimes phyllodes are very asymmetric (even bizarre!). In Wattles of the Pilbara an attempt has been made to score entities using a few conventional shape terms but it is advisable to select more than one state when using the Phyllode shape feature (to allow for misinterpretation).
Phyllode features with the best discriminating power are included in the Fast Find subset and relate to dimension (length and width), cross-section shape, apex and nervature.
Phyllode measurement is an easy feature to use (see Phyllode length and Phyllode width features); however, as with any numeric feature there are a few important points to bear in mind:
- Include a range of measurements (taken from "average" looking phyllodes) ignore atypically large or atypically small phyllodes.
- Measure accurately, especially on very small phyllodes (i.e. less than about 5 mm long or wide); an error of even 1 mm may result in your eliminating the correct answer from Entities Remaining.
- Ignore new shoots (apart from their smaller size, phyllodes on new shoots often are more thinly textured than mature phyllodes and may be a different colour or have a different indumentum); as a rule of thumb you should start measuring phyllodes at about 10-20 cm from the apex of your specimen.
Phyllode cross-section shape is one of those features whose states are largely qualitatively defined and therefore differ from one another only by degree. Therefore, exercise caution when using this feature in order not to make errors of misinterpretation. For example, the differences between round, sub-round, compressed and flat phyllodes are defined simply by the degree to which the lamina is flattened. Although Wattles of the Pilbara provides feature notes that define and illustrate each of these terms, it is still easy to misinterpret things when you try and match your specimen to the various states (especially when the phyllodes are very narrow). It is therefore advisable to select more than one state if you have any doubts at all about which is the appropriate one to use. Another potential problem here is that the cross-section shape can change as a result of drying, for example, a terete fleshy phyllode when fresh may become more or less flat when dry. We have attempted to account for this sort of variation in our coding so regardless of which state you choose the 'right' answer should be retained in Entities Remaining. This feature has strongest discriminating power when the phyllodes are not flat. The most reliable way of determining cross-section shape is to section the phyllode (when fresh, or if dry, after it has been softened by soaking) and observe the cut end at x10 magnification or higher.
The spininess of the Phyllode apex is, like cross-sectional shape, open to misinterpretation, at least in certain cases. Most people will have no trouble deciding whether the apical point is sharply spiny: these phyllodes end in needle-like points that readily pierce the skin upon touch. Similarly, it is easy to decide if phyllodes are clearly not spiny. However, it is the in-between situation, coarsely spiny, that can cause problems. It is advisable not to use the state coarsely spiny by itself, but to select also sharply spiny or not spiny (depending upon your subjective assessment of the degree of sharpness of the apical point) when using this feature.
Phyllode nervation features are extremely important and your ability to quickly and effectively identify Acacia species will be greatly enhanced if you can learn to correctly interpret them. At first you may find the nerves difficult to see because they are often very fine, or obscured by hairs, resin or surface wrinkling (care should be taken not to misinterpret these phyllodes as nerveless: truly nerveless phyllodes are rare in Acacia). However, with experience and a little patience one can normally develop a "feel" for these very important features. Observation at x10 magnification or higher is recommended here. In dry material the nerves are usually easily seen under a microscope (it is best to use an oblique light source because the nerves are often slightly raised and will cast a narrow shadow). In living material in the field the nerves of flat phyllodes can normally be easily seen by holding the phyllode up to the sky (not directly into the sun) and observing with transmitted light; for non-flat phyllodes the nerves are often a paler colour than the surrounding tissue and can be seen by rolling the phyllode between the thumb and index finger while viewing the surface. When determining the Phyllode nerve number features it is important to count all the longitudinal nerves, not just the most prominent ones.
Put simply, Acacia phyllodes may be either uninerved (i.e. 1-nerved) or plurinerved (i.e. many-nerved). Flat uninerved phyllodes have a single longitudinal nerve on each surface; this nerve usually extend from the base to the apex and may be located along the centre-line of the phyllode or off to one side (most commonly near the lower margin). Plurinerved flat phyllodes on the other hand have two to many longitudinal nerves on each surface and these may range from +/- touching one another (with some, especially the one down the centre-line of the phyllode, more pronounced than the rest) to being widely spaced. Few to many anastomosing minor nerves may develop within the inter-nerve spaces of plurinerved phyllodes (see Phyllode nerve anastomoses feature). When well-developed the anastomoses form a conspicuous net-like reticulum and the shape and size of the nerve-islands that are formed can be important in distinguishing between species. When phyllodes are not flat (i.e. terete to compressed or angular) the most common nerve numbers encountered are four (with usually only one able to be seen when observed in plane view), eight (with usually two or three able to be seen when observed in plane view, with clear spaces between each nerve) or more than eight (with usually many able to be seen when observed in plane view, with the nerves positioned very close to one another).
Bipinnate leaves
True (bipinnate) leaves are found in about 10% of the Australian Acacia flora and in the Pilbara there is only one species, Vachellia farnesiana (formerly called Acacia farnesiana) that has this type of foliage. Bipinnate leaves consist of a primary central axis and one to many secondary axes arranged on opposite sides of it (leaflets are arranged on opposite sides of the secondary axes). The primary axes comprise the petiole at the base and, when present, the rachis above the petiole. The secondary axes, together with their supporting leaflets, are called pinnae. Generally the most informative leaf features relate to the number and length of the pinnae and the length of the rachis.
Glands
Glands (extra-floral nectaries) occur on the phyllodes and leaves of almost all Australian acacias and their position, number, structure and size can be important in identifying entities. Glands are normally small, circular structures and are often not easily seen without the aid of magnification (x10 or higher). Therefore, a little practice (and patience) may be required to correctly interpret these often-helpful features. Before answering questions relating to glands it is advisable to examine a number of leaves or phyllodes (ignoring new shoots) to familiarise yourself with the range of variation exhibited by your material.
Two gland features are particularly relevant to Pilbara wattles, namely, their position and number. The small glands are located on the upper margin or edge of the phyllode and in a few cases also at the base of the apical point of the phyllode; normally there is only a single gland but in a few cases more than one gland occurs along the margin of the phyllode.
The feature Gland distance above pulvinus has quite good discriminating power, particularly for species with 1-nerved phyllodes. Measure the distance from the distal end of the pulvinus to the gland; if more than one gland is present on the phyllode then measure the distance to the lowermost gland.
Inflorescences
The tiny Acacia flowers are aggregated into heads or spikes that are usually borne on peduncles that may arise directly from within the axil of phyllodes or leaves, or be arranged in compound structures called racemes or panicles. Understanding these and other features of Acacia inflorescences is important for distinguishing between species. Although inflorescence features are most easily determined when plants are in flower many can be seen, or inferred, from fruiting material but in these cases you need to take care to ensure that the structures are interpreted correctly.
Inflorescence type is normally a straight-forward feature which is easy to determine: the peduncles supporting the heads or spikes arise either directly from within the axil of the phyllodes or leaves (simple), or are arranged along an un-branched (racemose) or branched (paniculate) common axis. Occasionally you may encounter specimens with complex inflorescences (in which case care is needed to correctly interpret the structure) or those possessing more than one type of inflorescence. In the latter case you will need to select more than one state, which may significantly reduce the effectiveness of this feature (particularly if both simple and racemose inflorescences are present on your specimen). Sometimes the racemes are very short (with axes 1-2 mm long, or less): in these cases we have coded the entities as both simple and racemose to allow for misinterpretation. The feature Raceme length will often be effective in substantially reducing the list in Entities Remaining if your specimen has very short racemes.
Raceme axes may grow out as leafy shoots at their apices and this can occur either during or after anthesis. In fruiting specimens these structures are identifiable as racemes because the pod-bearing peduncles, which are located at the base of the branchlets, are not subtended by phyllodes. In some cases simple inflorescences develop within the axils of phyllodes or leaves on these leafy shoots: in these cases we have coded the entity as both simple and racemose. Sometimes simple inflorescences arise from within the axil of juvenile phyllodes on actively elongating new shoots; care needs to be taken not to misinterpret these structures as racemes.
Head/spike shape is a good feature with strong discriminating power. Individual flowers are inserted on an axis (the receptacle) at the end of the peduncle and are aggregated into globular heads or obloid to ellipsoid heads, or into elongated cylindrical spikes. However, because these three states differ only by the degree of elongation of the receptacle it is sometimes easy to misinterpret this feature, especially when the (intermediate) obloid to ellipsoid heads state is involved.
Head/spike shape is best determined when specimens are at anthesis (i.e. when the flowers are fully expanded with the stamens exserted) or in mature bud. In fruiting specimens the head/spike shape can often be determined by inspecting the disposition of flower scars on the receptacle (best to observe at x10 magnification or higher). However, care is needed if this is done because in entities with globular heads the fruiting receptacles are commonly obloid and in entities with cylindrical spikes the receptacle above the insertion of the uppermost pod commonly withers and therefore appears artificially shortened (thus, can be misinterpreted as obloid or sometimes even globular).
Peduncle length, like most other numeric features in Wattles of the Pilbara, has strong discrimination power. The peduncle is the stalk of the inflorescence and is terminated by the receptacle upon which the flowers are inserted. Peduncles arise either directly from within the axil of the phyllode or leaf, or are inserted along a raceme axis. Because peduncles are often short (commonly less than 1 cm long) extra care should be taken to ensure that you measure their length accurately. Measure from base of peduncle to base of receptacle (in fruiting material the receptacle is demarked by the presence of flower scars). It is also best to include a range of measurements (i.e. longest and shortest peduncles) and to use flowering material. At anthesis the apical portion of the peduncle is often obscured by the anthers which must be bent out of the way in order to measure accurately (a less precise alternative is to add 1-2 mm to the length you measure without bending the anthers).
Although Peduncle hair presence and Peduncle hair orientation are reasonably 'good' features they are best ignored unless you are confident about their use. Observation at x10 magnification or higher is recommended because when present the hairs may be very sparse, minute or embedded in resin, thus difficult to observe. Furthermore, it is best to use flowering material to assess these features.
By loading the Inflorescence features subset you will see that Wattles of the Pilbara provides a total of 10 inflorescence features for you to use. However, apart from the Fast Find features just discussed most of these features have variable, and may have limited discriminating power (their effectiveness depends upon where you are in your identification). Sepal fusion is an exception - this is a 'good' feature but it is often not easy to determine the degree to which sepals are united without the aid of strong magnification; under normal circumstances it will not be necessary for you use this feature.
Pods and seeds
Of the 18 pod and seed features provided in Wattles of the Pilbara Pod width has rather strong discriminating power and is the only carpological feature included in the Fast Find subset. Measure pods at their widest point and be sure to measure accurately, particularly if the width is less than about 5 mm. It is best to include a range of measurements (i.e. widest and narrowest pods) and to ignore atypically narrow pods (because these are often not properly developed and contain aborted seeds).
Features such as Pod shape, Pod curvature and Pod texture are often difficult to answer due in part to difficulties in unambiguously defining the states of these features. It is therefore advisable that you consult the help notes provided within the key for these features and to select more than one state if you have any doubts about how to answer these questions. Seed features are generally less ambiguous but again use the help notes which are provided in the key.
Flowering plants sometimes retain old pods or dehisced pod valves from a previous years’ fruiting and it is good practice to collect these for use in your subsequent identification. Be careful, however, when using undehisced old pods because these commonly do not develop properly to maturity and may therefore be atypically narrow (thereby producing spurious results if the important pod width feature is used). Undeveloped pods are recognized by being seedless or containing aborted seeds.
Old pods and pod valves can often also be found on the ground under the plant, but care should be taken to ensure that these belong to the plant from which the foliage and flowers are taken (papery and other thin-textured pods in particular can be easily transported between plants by wind or water).
Distribution features
Distribution features have quite strong discriminating power; however, it is advisable not to use them too early in your identification. The reason for this is because your specimen may represent a new record for the region that you are dealing with, and if so, the entity represented by your specimen will be eliminated from Entities Remaining if you choose that region.
Such “erroneous” results are less likely to occur when working at the broad regional level (i.e. when you use the IBRA region feature). However, be more careful when using the 1: 250 000 map sheet feature which deals with smaller geographic areas. This is especially true if your specimen was collected from near the boundary between two or more map sheets. In these cases it is advisable to select more than one sheet to allow for range extensions or geographic imprecision.
» Best practice in performing identifications with this key
This section is a short ’best practice’ guide to allow you to make the most of the advantages and flexibility of Wattles of the Pilbara key and of the Lucid software under which it runs. Of course, no two identifications will be the same, and you will need to be flexible in your approach. However, taking note of the suggestions below may help, especially if you are new to Lucid or interactive keys.
This section is especially important if you are familiar with using printed identification keys in books, but are new to interactive keys. An interactive key like Wattles of the Pilbara works in some ways like a printed key but in other ways is quite different. Lucid keys are a type of interactive multi-access (also called a random-access key). While the questions (couplets) relating to characters of a printed key need to be answered in a fixed order, in Lucid you can address any question (which are called features) at any time. One of the big advantages of this is that you need not get ‘stuck’ by being faced with a question that you cannot answer - if this happens, simply find a question that you can answer. It is important to use this ability, and not to dwell overlong on a feature that is difficult to answer.
This raises another important advantage of a random-access key. There is no need to have a complete specimen to be able to identify it using Wattles of the Pilbara key. Of course, the more complete your specimen, the more likely you are to be able to identify it quickly, easily and accurately. Many Acacia entities (e.g. species, subspecies, varieties, hybrids, etc.) can be identified by using a combination of phyllode/leaf and inflorescence features (or phyllode/leaf and pod features), but if not you will often be able to narrow the number of entities down to a short list of entities to check further.
You will usually find it useful to proceed with an identification using the steps below.
- Become familiar with the specimen. Briefly reviewing the characteristics of your specimen before you start will make it easier as you proceed through the identification. Also, some plants possess unusual or distinctive features- using these may enable the specimen to be keyed out in very few steps. As you become increasingly familiar with Acacia and the Wattles of the Pilbara key you will come to know many of the characters (which are called features in Lucid), and you will know where to find them in the key.
- Choose the appropriate features. The Wattles of the Pilbara key has a wide range of features, ranging from ones dealing with the obvious and simple features to ones dealing with features that are minute and obscure (these are called cryptic features). Not all features have equal discriminating power – some are better than others, depending upon where you are in the identification process. Therefore, choosing the appropriate feature is important in getting you most quickly to the ‘right’ answer. The problem is, of course, that unless you are familiar with Acacias it is often difficult to know what features are appropriate to use in particular circumstances. Fortunately there is some assistance available to you in this regard.
The Wattles of the Pilbara key divides its features into six subsets – you can assess these by using the Subsets button on the tool bar. You may ask Lucid to display all the features in its list of Features Available (this is the All subset), or restrict your request to any subset of features, namely, Fast Find, Vegetative features, Phyllode features, Inflorescence features and Pod and seed features. Choosing an appropriate subset will make Features Available easier to scan, and prevents it being cluttered with features that you do not require or cannot possibly answer.
The Fast Find subset is of special importance and it is strongly recommended that you commence your identification by using this subset (this is the default subset you will see when the Wattles of the Pilbara key is first opened). The features in this subset are designed to most quickly reduce the numbers of remaining entities to a few. After answering as many questions as you can in the Fast Find subset continue your identification by either loading another feature subset or by using the Best or Shortcuts buttons on the toolbar.
Numeric features usually have strong discriminating power but it is important to measure accurately, especially if the size is below 5 mm. Also, numeric features work best if you include a range of values (i.e. smallest and largest) for the organ being measured.Note: record all measurements in Wattles of the Pilbara in millimeters.
For Distribution features it is advisable not to use them too early in the identification (just in case the plant being identified is a new to the area). Also, if a specimen comes from near the boundary between two or more geographic regions, then select more than one region to allow for range extensions or geographic imprecision.
Some cryptic features are especially powerful (e.g. gland distance and sepal division) but determining them often requires access to a microscope. In general it is best to leave these sorts of features to late in the identification – if all else fails.
- When you have addressed all the obvious features, ask Lucid to suggest the best remaining feature. The Best option will cause Lucid to assess which of the remaining features will best reduce the list of Entities Remaining. Using one or other of these ‘best’ features would give you the most efficient next step. It is sensible to start using Best after you have used the Fast Find subset and have run out of other easy and obvious features.
- Always skip a feature that you are unsure about. The easiest way to go astray with an identification is to guess at a feature that you are unsure about, either because you don’t understand the feature or because the feature is not clear on the specimen. One of the great advantages of an interactive key is the ability to skip feature – use this option.
- When selecting states, always choose multiple states if you are uncertain of the correct choice. Lucid allows you to choose multiple states from one feature. These states will be connected with an or link, and Lucid will search for all entities with state A or state B. If you are unsure which of two or more states your specimen has, then choose them all. That way, you can be sure that your target species will remain in Entities Remaining. (Note, however, that choosing all the states of a feature is equivalent to not choosing the feature at all, since no entities would be removed from Entities Remaining.)
- If you end up with no entities remaining, review your chosen feature states and delete any that you are dubious about. An empty Entities Remaining list means that no entity in the Wattles of the Pilbara database matches the selection of feature states that you have made. This may be because you have found a new species, or because we have made an error in coding the data. However, it is most likely that you have made a mistake in one or more features used. If you are dubious about any of your choices try deleting the states that you are unsure about to see what effect it has. One or more entities may move back into Entities Remaining list. In difficult cases, you may need to ‘play’ with the key, adding or deleting states progressively to try and find the best matching entity.
- Do not assume that you will end up with a single entity remaining. Some entities are very hard to differentiate, except by using difficult or obscure features. Even after you have addressed all the features that you can, you may still have a short list of entities remaining instead of just one. But you are still much closer to an identification than you otherwise would have been.
- Once you have a potential target entity (or small group of entities), check the associated information to see if it matches. Getting a possible name of an entity from Wattles of the Pilbara is not the end of an identification. You may have made errors, or you may have a species that is not in the key. In these cases, the key may have provided you with the wrong name. Always check the accessory information for the entity (or entities), namely, the descriptions and images.